Saturday, September 25, 2010
Hockey Jersey Training Camp - Day 9 - The Collecting Community
Day 9 of Hockey Jersey Training Camp moves onto our next "drill" on The Collecting Community.
You've located your jersey and perhaps a patch to put on it, decided whose name and number to add to it, sent it in for customizing and your newly lettered jersey has (finally) arrived in the mail.
Now what? Obviously you can wear it to a game or just around town, making certain to NOT tuck it in, or you can show it off to your friend's friend who says he can get "any jersey you want" for $40 and has zero appreciation for your authentic jersey.
Or, you can show it off to like minds online who can relate to the scarcity of your new sweater, the accuracy of the customization and the attention to detail that your patch brings to your jersey.
Two such places are the forums at JerseyCentral.org, for fans of jerseys of all sports, and IceJerseys.com, who host a hockey jersey only forum for jersey collectors.
Here you can ask questions about the authenticity of potential purchases, learn the finer points of how to spot fakes yourself, where to locate patches, advice on customizers and player choices for your jerseys, buy new jerseys and sell your old ones once you have established yourself as a member of either community and simply show off your new arrival as well as seeing what unique things others have acquired, which will certainly inspire you to try to duplicate one for yourself from time to time.
While the Ice Jerseys forum is strictly hockey related, Jersey Central has separate forums for Throwbacks, NFL, MLB, NBA, Soccer and College as well as hockey. In addition, both forums each have a very active marketplace section and general discussion section.
The depth of knowledge available is quite remarkable as passionate collectors share their insights and knowledge on all things jersey related.
Once you've joined a forum, it's part of the fun to share your collection with others. Photographing your jerseys is an essential part of that and we have a few tips. We recommend a mid-tone background of either a beige carpet, wood flooring or a roll of seamless paper. A mid-tone background will work for both white and dark colored jerseys and look more consistent from shot to shot.
We do not recommend white or black backgrounds or tile surfaces or fabric surfaces, such as a sheet. White backgrounds won't allow white jerseys to separate very well and will fool the camera into thinking the scene is too bright, resulting in underexposed, grey photos, while black will have the opposite results. Black backgrounds will cause light colored jerseys to be overexposed and black jerseys to disappear into the background. The shine on tile surfaces will cause a glare from the flash which may also result in underexposed images. Those with prominent grout will only serve to distract from the jersey, the same of which can be said for a wrinkled sheet.
Once you have chosen your background, lay your jersey down, fold the arms over and get the jersey as flat as possible to reduce as many wrinkles as you can.
We do recommend the use of an on-camera flash. The light hitting the jersey from directly overhead will reduce the appearance of any wrinkles in the jersey, which would be emphasized by any side lighting, such as that coming from a window on one side of the jersey. A flash also has the added benefit of being the same each time, while reliance on sunlight leaves you subject to both sunny and cloudy days, resulting in inconsistent lighting.
To summarize, pick a background, not too light or not too dark, with as little pattern to it as possible and shoot from straight overhead with a flash.
You will need to host your own photos on the internet to be able to post them to any forum. There are many free photo hosting sites from which to choose from, Flickr, Photobucket or Webshots.
As for meeting up with other collectors in person, there are two events that we recommend.
The first is the annual MeiGray Game-Worn Jersey Expo in New Jersey where the largest dealer of NHL game worn jerseys brings together collectors and dealers alike in a festival of jerseys unlike any other.
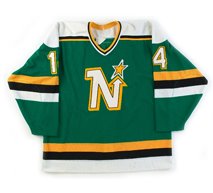
The other event we recommend is the Minnesota Hockey Collectors Expo at Tom Reid's Hockey City Pub in St. Paul, Minnesota. The 9th annual Expo takes place Sunday, October 3rd from 11 AM to 6 PM. This event is free and features collectors bringing their favorites from their personal collection for some good old show and tell, with an emphasis on jerseys related to the Minnesota Wild, Minnesota North Stars and Minnesota Gophers, as well as many other interesting jerseys from throughout the hockey world. It's great opportunity to see some great game worn jerseys up close, meet some new people and perhaps add a new jersey to your collection.
There are other expos held throughout the country, perhaps one near you. Today there is one scheduled for Pittsburgh from 10am-7pm at the ballroom of the Epiphany Church, located next to the new Consol Energy Center, which happens to be hosting a Pittsburgh Penguins pre-season game vs the Columbus Blue Jackets at 7pm. Admission to the Expo is free.
There is another meeting in March in Northern Virginia, as well as a long-running one in Detroit. Announcements and details can be found on the forums at GameWorn.net.
Labels:
Hockey Jersey Training Camp
Friday, September 24, 2010
Hockey jersey Training Camp - Day 8 - How to Communicate With Your Customizers
Day 8 of Hockey Jersey Training Camp moves onto our next "drill" on how to communicate with your customizers.
When spending your hard earned money having your rare jersey customized, the last thing you want when you finally get it back is an unwanted surprise, be it the wrong font, the wrong placement for a patch or wrong material for a nameplate. This is a battle we have fought dating back to the first jersey we have ever owned.
In order to avoid disappointment, we make a policy of over-communicating he specifics of what we want and expect on our completed jersey.
As we referenced on Day 4 of Hockey Jersey Training Camp, our favorite sources for photos is GettyImages.com's editorial sports section. It does take some experience to learn how to do effective searching on Getty Images, and older pictures are often not labelled very accurately with the correct date or even year, but there's more than enough on file there to help document just about any jersey project you'd like done.
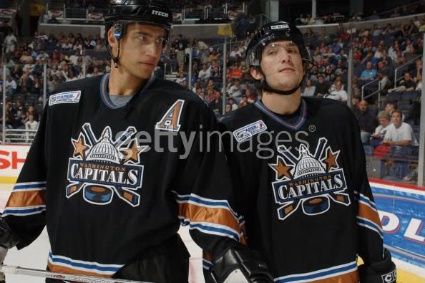
For our sample, let's pick an Alexander Ovechkin Washington Capitals rookie home jersey. Start by searching for the team you are interested in. If you search for just the player, you may exclude some excellent sample photos of the style of jersey you want done. Perhaps there's a photo of #18 Matt Pettinger that documents that style of jersey perfectly. Once you get an overwhelming 757 pages of results, begin to narrow it down by selecting "search within" and entering the year 2005 in the search box. Don't enter "2005-06", as the photos are tagged with the year they were taken in, not the NHL season they are from. If you don't find what you want in "2005", try a new search in 2006 to search the second half of the season. (Tip: the older the pictures, from the last half of 2005-06, will be on the highest number page, as the results displayed will be the newest ones taken, which would make them from the 2006-07 season and not relevant to our project)
Searching for just 2005 will narrow down the results to 39 pages. Now look in the left hand column in the "Refine this search" box to see the various options. Under "specific people", Oveckhin's name appears with the number 206 next to it. Clicking on his name will narrow the photos down to just those 206 photos that contain Ovechkin, which now number a reasonable four pages. To narrow it down to the Capitals black home jersey, return to the "Refine this search" box again and choose either "MCI Center" or "Washington DC" in the location section, which now leaves us with two pages of Ovechkin from his rookie season in his home jersey.
Scrolling through the photos reveals one interesting photo, Ovechkin from his rookie season wearing the NHL Cares Hurricane Katrina Relief Fund patch. Further research elsewhere on the internet about the patch and the date it was worn reveals that the Katrina patch was worn for the first period of each team's first home game of the season, which was Ovechkin's NHL debut in which he scored two goals!
That to us is one of the most fun parts of the hobby, doing our research and coming across a rare variation of a jersey which allows us to add a patch to ours, setting it apart from the masses and giving our jersey an interesting story behind it.
Clicking on the thumbnail will open the photo in a larger size in a new window. After looking through the remainder of the thumbnails, we find a few other great examples, especially of the back of the jersey which show the font style for the name and number. Each photo we like is saved to our desktop.
With a player as popular as Ovechkin, photos are easy to come by. On occasion we will use pictures of other players from the same team and year, especially if they have digits in common with what we want on our jersey.
Other sources for photos are Spirit of the Game, a dealer in game worn hockey jerseys who has numerous pictures of jerseys, mainly from 1970 to 2004, and Webshots.com, which seems to be the website of choice for jersey collectors to show off their collections. Other collectors use photo hosting sites such as Flickr.com and Photobucket.com as well.
Another option is to do a Google Image search for the player in question. Hockey cards can also be of value if all else fails.
Once all our pictures have been chosen, we fire up Photoshop and create a new 8 x 10 document, and then
- type exactly what we want added to the jersey across the top
- spell out in detail all the colors the name and numbers are
- if there is a nameplate (or not) and of what material (as some places will use twill if it is not specified)
- place and crop our sample photos of the back, arms and any patches
- add any notes about the customizing we feel are relevant
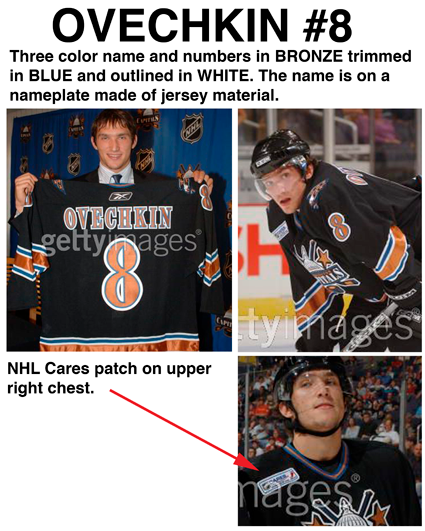
Spelling out the colors the numbers are seems incredibly basic, but we once saw this jersey done with black trim around the numbers rather than the accurate blue color. Here is the finished sample sheet.
Don't be afraid to make a second sheet for any project with a lot of details or complicated instructions. Too much information is never a bad thing.
After obtaining the needed patch, we then print the info sheet out, nicely fold our jersey, put the jersey in a zip lock bag, slide the info sheet into the bag so it's visible and place any patches to be added on in the bag. Finally, we squeeze as much air out of the bag we can in order to fit as many jerseys as possible in the box when sending a large order.
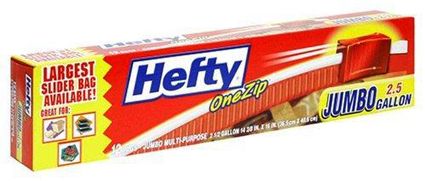
For the plastic bag, we like to use Hefty 2.5 gallon bags available from Target. They are the perfect size for a folded jersey and will nicely contain the jersey, info sheet and loose patches in one nice bundle, as well as protecting the jersey from any unforeseen shipping disasters.
We then type out a letter to the customizers, being certain to include our name and address as well as their name and address (in the event our package ever needs to be identified), explaining that the top line of the info sheet is what is to be sewn on all the jerseys. We also make certain to include contact info, such as our email address and phone number, so we can be contacted in case of any questions about a jersey in production as well as being reached for our payment information when the order is completed. This is also an opportunity to further explain anything you feel might be confusing or complicated in your order.
Here is the finished result of the Ovechkin jersey.
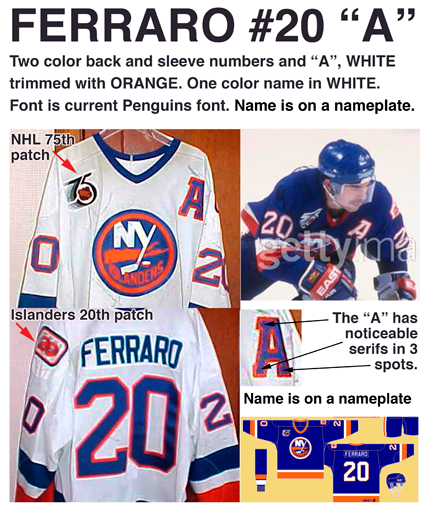
Here is another example of a sample sheet with some important details pointed out, the use of home jersey photos, to show fonts and patch placements for a road jersey, using photos from a game worn jersey, as well as an illustration from NHLUniforms.com, followed by the finished result.
Before doing our research, we never realized that the Islanders had used the Penguins number font and the quirky "A" with the extra serifs. Had we not done our part, we would have been likely given a jersey with a standard block font and a typical "A", rather than our more accurate jersey with it's unique details.
Half the responsibility on getting an accurate jersey is yours. You can't send out a Tampa Bay Lightning jersey, which as been worn with four different fonts for the numbers, and expect the customizers to know what you have in mind without letting them know.
To avoid getting back a jersey that wasn't done the way you expected it was going to be, never assume the customizers can read your mind and show them exactly what you are expecting and and explain the details fully and see if your results don't improve. Yes, it's admittedly over the top, but it's worked well so far and we really enjoy researching the sample photos and we know for a fact the customizers appreciate knowing our expectations and getting the samples we provide them.
Labels:
Hockey Jersey Training Camp
Thursday, September 23, 2010
Hockey Jersey Training Camp - Day 7 - Where to Get Your Jersey Customized
Day 7 of Hockey Jersey Training Camp has our next "drill" dealing with the all-important question, Where to Get Your Jersey Customized?
Now that you have decided who to put on your jersey and obtained your patches, the next step is to decide who to trust with your jersey.
For us, having jerseys customized has been the most frustrating, annoying, difficult and least fun part of this hobby. Clearly buying jerseys already customized will save you many headaches and a lot of expense, but it will naturally limit you to mainly a narrow group of the obvious star players for the most part.
You will likely be able to get your 1994 New York Rangers jersey with Mark Messier, Brian Leetch and Mike Richter, but for those of you who want Stephane Matteau, Adam Graves or Esa Tikkanen - good luck finding one of those on demand when you feel urge to buy one, and that's the beauty of buying a blank jersey.
A blank jersey is an opportunity to control a lot more of the process, choose a player out of the ordinary and is the most fun, interesting and rewarding aspect of the hobby in addition to the "thrill of the hunt" when you are finally able to track down that incredibly obscure and hard to find Ukraine National Team jersey you've wanted for eight years.
The decision on where to send our jerseys begins with Exclusive Pro Sports, located in Rockford, Illinois. EPS does work for clients both large and small, and could easily dismiss the individual collector as too small for them to bother with, but their owner has made a commitment to always maintain doing work for the people who got them where they are today - the individual collector.
Due to the amount of work they do, they are not always the quickest to get your jersey completed, but when it does arrive, the accuracy and quality of the work are top rate. The more obscure a jersey is and the more off beat the request, the more likely we are to send it to EPS, as their ability to follow directions and pay attention to detail is unsurpassed.
Take a look at this jersey for example. It's unlikely anyone has this number font used by Adidas from the mid-1980's on file. Add in the fact Adidas used a fuzzy, heat sealed flocked, not felt, material for the lettering.
Compare that to the game worn Czechoslovakia jersey we sent them as an example, and you can see why we are so impressed with the quality of their work.
One huge plus to dealing with EPS is their uncanny ability to produce the correct colors and material for nameplates. In the approximately 200 jerseys we have sent EPS, we've only stumped them twice, and we've sent mesh jerseys from the late 1980's, airknit, ultrafil and dazzle cloth. Take a look at this jersey. They even created the unique "number plate" out of airknit to match the nameplate rather than the more easily obtained twill we were expecting them to use.
Other aspects that make EPS stand out are that they sell name and number kits so you can do your own sewing if you are able and their stripping and customizing service, where they can remove by hand old names and numbers from a jersey, clean off glue or stains from the previous lettering and re-cutomize your jersey to the new player of your choice.
We have also tried other customizers with good results as well. Gameday Sports Archives, located in Toronto, Ontario did some quality work for us and was willing to send approval pictures to us prior to sewing in case we had any tweaks we wanted to request. They do not carry the depth of material for nameplates as EPS, but do stock the basic colors in the correct fabric. While they do charge a bit extra for nameplates the same material as the jersey, that is offset in our case by the fact they will sew patches on that we provide at no additional cost.
They also were quite flexible and cooperative. Twice we changed our minds on what we wanted done to a jersey, once due to a player leaving a our local team while the jersey was in GSA's possession and once due to finding additional photos which showed a players first initial on his nameplate that we were unaware of when we sent the jersey in. In both cases the customization was redone and came out looking great. If we did not have to deal with sending packages across the Canadian border, we would use them more often, as their turnaround time was quite good, something that will score a lot of bonus points with us based on some of our horror stories of the past.
A newcomer to the customizing business is Vintage Minnesota Hockey. Started due to the same dissatisfaction with the quality of customizing we have faced, VMH will take on any challenge and is great to work with, as they are also willing to supply approval files of their artwork prior to cutting the twill, and the quality of their sewing is outstanding. As a smaller operation, they also do a very impressive job of finding material for nameplates, including once coming up with one EPS could not!
VMH also offers unique services such as adding fight straps to jerseys, name and number kits, embroidery options as well as their exclusive line of Minnesota related jerseys we documented on Day 2 of Hockey Jersey Training Camp. They've been on your side of the hobby and fully appreciate the attention to detail and accuracy you want and provide the customer service you only wish the others would.
We have to take a moment to endorse Tripe Threat Sports in Mokena, Illinois. They offer customizing of NHL jerseys as well. While we have only used them for a few hockey jerseys, we have regularly sent them all of our Chicago Cubs baseball jerseys and can vouch for the accuracy and quality of their work, as well as their turn around time.
IceJerseys.com not only sells jerseys, but will accept your jersey to be customized as well. Their work is hand sewn and they make a point of using fabric, not twill, nameplates. They also stand by their 100% satisfaction guarantee.
We have also heard recommendations for Jersey Express out of Buffalo, New York and their reputation in the collecting community is a positive one. We have purchased a customized jersey from them when the CCM Vintage Line first came out and were quite pleased with it.
SportsK.com, located in Michigan, is another name that has come up with positive feedback among collectors and is worth considering, as well as House O'Hockey in Pittsburgh, who are preferred by several Penguins fans when asked for their recommendation.
Another approach other collectors have taken is to research who does the actual game jerseys for the various teams around the country at the NHL, minor league and even college levels. We have actually gone this route a few times, but have honestly had mixed results, finding some to be dead-on accurate, and others surprisingly inaccurate and arrogant in their attitude toward the individual client. Perhaps with an NHL team for a client, they feel they don't need for or want single jersey orders, not realizing the passion of a jersey collector can amount to a significant number of orders over the long run, as the majority of collectors focus on their favorite team and would want to send their jerseys to the same place as the pros.
Feel free to add your recommendations or warnings about customizers in the comments section below.
Labels:
Hockey Jersey Training Camp
Wednesday, September 22, 2010
Hockey Jersey Training Camp - Day 6 - How to Make Your Own Patches
Hockey Jersey Training Camp now reaches Day 6 and our "drill" today is on How to Make Your Own Patches.
One of the things we really like to collect here at Third String Goalie are international jerseys. Those worn in the annual IIHF World Championships can be distinguished by their sponsorship patches worn on the shoulders or upper arms, which give World Championship jerseys their distinctive look.
Unfortunately, there are no sources we know of to obtain the embroidered versions for our jerseys, so we decided to see if we could make our own, having printed a number of our own t-shirts in the past.
Using the picture resources available on Getty Images, and the International Ice Hockey Federation's website, as well as some publications we have in our personal library, it's possible to determine which company was featured on many teams jerseys from year to year.
Some nation's sponsor changes from year to year, while others keep the same one for for a number of consecutive years, but the style of patch may or may not remain the same, so it's important to do your research to determine which exact version is the correct one for the year you want to replicate.
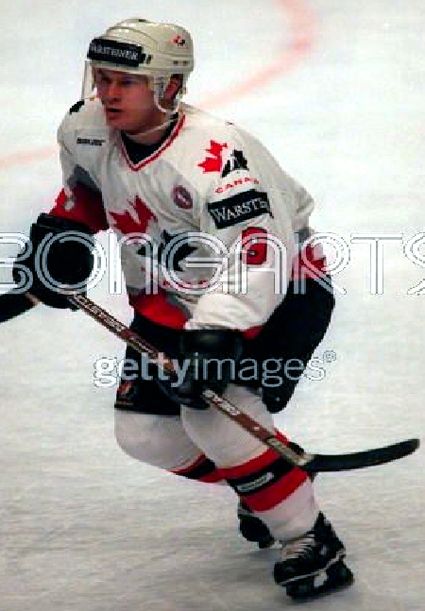
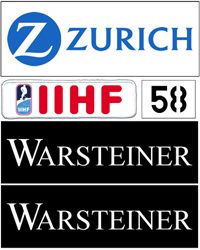
Once you have decided on the company logo you wish to feature, the next step is to create the artwork needed to make your patch. For that, we rely on BrandsOfTheWorld.com. It appears that you now have to register for an account with them prior to downloading any logos. Once you are registered, simply type the name of the company whose logo you want to find in the search box and hopefully you will get just the logo you need for your patch. Common sponsors include Zepter, Skoda, Tissot and Warsteiner. For our purposes, let's focus first on Warsteiner Beer. Here's the patch in action on a Team Canada jersey in 1996.
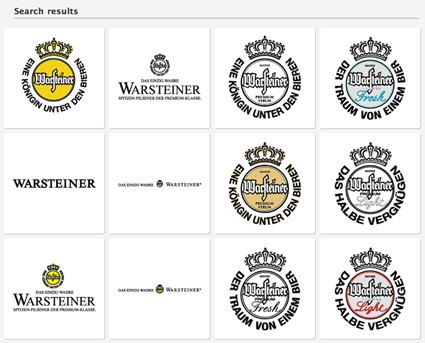
Looking at the search results from BOTW, we can see (counting from the upper left) #2 and #7 are the closest to the logo used on the patch.
Since we only need part of the logo, in this case it does not matter which of the two versions we choose. Once you have agreed to their terms of use and downloaded the logo, you can open it in either Adobe Illustrator or Adobe Photoshop.
The actual patches vary in length and height, but in general are 8" wide and 3" in height. In photoshop we create a rectangle that size. Technically, we make the rectangle just slightly under 8" in order to fit the width of a 10" x 8" photoshop document. You will need to vary the height of your patch to replicate the dimensions of the original you are reproducing, as some are narrower in height.
We fill the rectangle with the appropriate background color we want our patch to be. We then open the logo file in Illustrator and "ungroup" the various elements and throw away what is extraneous to our needs and copy and paste the Warsteiner word onto the black rectangle. If you are more comfortable, you can open the file with Photoshop and just erase the unwanted elements. Once the color of the Warsteiner wordmark has been changed from black to white (either in Illustrator prior to pasting or after it's in Photoshop) and it's sized and centered on the black rectangle, the artwork for a single patch is complete. Be sure to not have the logo too close to the edge of the rectangle in order to leave room for stitching. Now, simply make a copy of the first patch in order to have one for each shoulder and you're set.
Step 1aaaaaaaaaaaaaaaa Step 2aaaaaaaaaaaaaaaa Step 3
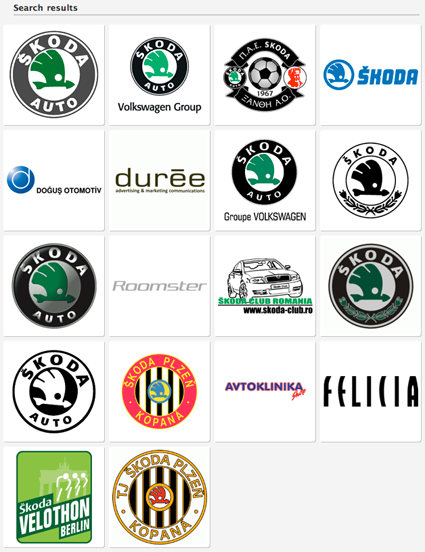
In the case of the Skoda patches, none of the round logos will work for the wordmark used on the patch.
We will then try to find the correct font in order to duplicate the wordmark on our own. Once you have identified the correct font, you can recreate the wordmark for the patch with the type tool in Illustrator or Photoshop.
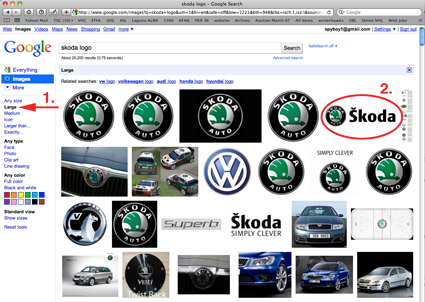
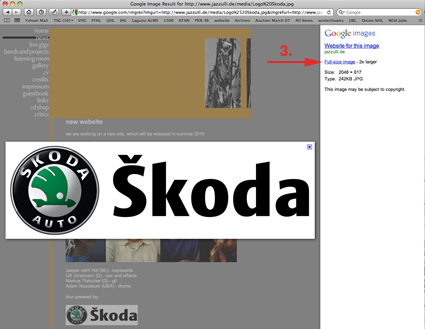
If you do not have an extensive font library, a third method to acquire a needed logo is to do a google image search for "Skoda logo" and hope for the best. Obviously the larger the image we can start with, the better results we can obtain, so once we have done the basic search, we select "large" in the links in the left hand column (#1).
Seeing a wordmark we like, we click on it (#2) and are taken to the website for the image. Look on the right hand side of that page and click on "Full-size image" (#3).
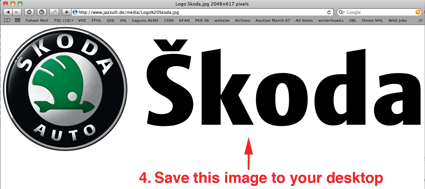
This will show you the image in it's full size.
Save it to your desktop by your preferred method (#4) and then create your artwork in Illustrator or Photoshop as detailed above.
To summarize, you need to obtain the logo you need for your patch by whatever method works for you, either downloading a eps file from the internet, creating it yourself with a graphic program, downloading an image from the internet or even scanning an ad from a magazine. Then recreate the artwork of the patch you wish to make in the program of your choice. A bit of internet savvy and some computer graphic skills will be quite helpful.
In addition to creating your own designs as described, you can also simply use a good quality photograph found online of an original patch from a game worn jersey. Quite often the shadowing and texture detail will survive through to your printed version, giving it a nice depth and a quite realistic appearance from a short distance, which is how most other people will view it.
The next step is to create the patch to be sewn on your jersey. You will need to buy something called "transfer paper". We recommend is Epson Transfer Paper and prefer to purchase it from Databazaar.com since they have the best price, especially when you buy more than one package and factor in their always free shipping. We have seen others sell the paper for $9.99, but charge $9.99 for shipping. You are free to do your own comparison search if you like, but we find ourselves coming back to Databazaar each time.
The main use for transfer paper is to make your own t-shirt designs using any inkjet printer. The transfer paper has a special coating which prevents the ink from soaking into the paper as it usually would. Your printed design on the transfer paper acts as an iron-on you will use to transfer your patch design onto a piece of white twill.
An important note: at some point in the process you will need to flip your design so it appears backwards when printed! You can either flip your image in photoshop prior to printing, or some printers have a setting which will do that for you as part of the printing process. We strongly recommend you read and understand the instructions that come with the transfer paper.
Final logo creation aaaaaaaaaaaaaaaaaa Flipped for printing
If your printer has a "t-shirt transfer" preset, or you follow the settings that come with the paper, your results will not be the best they can be. The basic setting for t-shirt transfers puts out very little ink, making for a lousy looking printout. This is fine for printing on a cotton t-shirt, as the ink will spread slightly when transferred onto a shirt, giving you a nice looking result. For our patch making purposes, we recommend going up one or two ink settings when printing on twill for deeper blacks and greater contrast which make for better looking patches. Look for a quality setting similar to "photo paper" or "glossy photo paper".
Try printing your design on a piece of plain paper on the "t-shirt transfers" setting and then one of the "photo paper" settings for comparison to not only see the difference in the amount of ink laid down on the paper, but to confirm that your images are in fact printing out backwards prior to wasting one of your precious sheets of transfer paper, which are generally $1.50 a sheet.
Once you have printed your transfers, treat them very gently, as they are quite fragile since the ink has not soaked in and is just sitting there on top of the transfer paper. We recommend putting a sheet of plain paper on top of them and putting them in an envelope or empty packaging some other paper came in for protection. It is critical that you keep any moisture away from your printed transfers. Any water droplets, be it a bead of sweat, splash, drop of rain or condensation drip from a glass, even a sneeze, will cause the ink to run like watercolor paint, ruining that image permanently.
Something you should understand about injket printers and transfer paper is that there is no white ink. Any white parts of your design will have to be supplied by the background material,wether it's making patches or t-shirts. If you were to try to transfer an image onto a black shirt, the black will overwhelm your image since the ink from your printer is very thin and not opaque in the least.
The other supply you will need is some white twill, the same material used for putting names and numbers on jerseys, which is available from Stahl's, who should allow you to purchase material without an account as a guest. A yard of twill (51" x 36"), the smallest amount you can buy, will yield 16 pieces 9" x 12", which is slightly bigger than a sheet of transfer paper. A yard of twill should be big enough to last most collectors a lifetime and will cost approximately $9 plus shipping. We recommend the kind of twill without any adhesive backing, which Stahl's calls unc twill 51".
The reason we recommend the non-adhesive backed twill is that many times we have located an embroidered version of a patch later on, and want to remove our patch and replace it. What we have encountered is the adhesive from the twill will remain on the jersey after our patch is removed and it can be quite visible, especially on darker jerseys. Quite frequently, the embroidered patch will not be large enough to cover the evidence of the printed original.
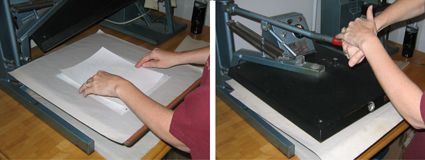
Rather than ironing on our designs ourselves at home, we prefer to take them to someone who has a professional heat press. The higher temperature and pressure the heat press can provide will give you outstanding results you simply cannot approach at home with a hand held iron. Look for a t-shirt shop or a shop that does team jerseys in your area.
Bring with your twill and your printed transfers oplus the instructions provided by Epson for the press operator to read so they will know what kind of settings to use with the transfer paper if they are not familiar with it.
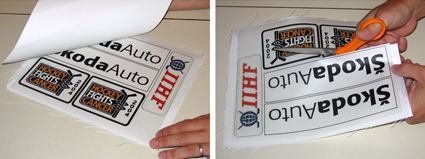
Placing the printed transfer paper on the twill and using the heat press
One other important tip to pass along is after your transfer is pressed onto the twill, do to NOT peel the backing paper off while the twill is still warm. It will cause the twill to distort in shape, resulting in a warped rectangle you will not want permanently sewn to your jersey. We recommend letting it cool down before taking the backing paper off.
Once you do remove the backing paper, there will be a layer of plastic adhered to the twill over the top of your patch design. Normally when making a t-shirt this will disappear in the wash. If possible, peel that off. It's a bit like trying to remove peeling skin after a sunburn or a film of Elmer's glue from your fingers after it's dried. This will make your final patch that much less shiny for the best possible look.
Now that your patches are printed, just cut them out with a sharp scissors and take them in to whomever you use for your sewing and have them applied with a zig-zag stitch for the proper look.
Peeling the backing paper off of the twill and then cutting out the patches
Here is the final product with the Warsteiner patches now sewn onto our 1996 Team Canada World Championships jersey.
The only critique is the semi-gloss sheen the finished patches have, but that is accentuated by the flash when we photograph them. They look better in person, especially when viewed at a distance of a few feet or more, as most people will view your jersey from while you are wearing it. The sheen is much less apparent on white patches, as shown below.
We have made other patches for various jerseys in our collection, and here is a small gallery of them.
Labels:
Hockey Jersey Training Camp
Tuesday, September 21, 2010
Hockey Jersey Training Camp - Day 5 - Patch Resources
It's Day 5 of Hockey Jersey Training Camp and our next "drill" is about jersey patch resources and removing the rigid plastic backing from certain patches.
Beginning with the 1921-22 Ottawa Senators, who proudly proclaimed themselves as Champions of the World, the NHL has a long history of celebratory, patriotic, anniversary of both city, team and even ownership, olympics games, memorial, charitable organizations, All-Star games, Stanley Cup Finals, arena openings and closings, special event games, such as the annual Hockey Hall of Fame game, season opening games in foreign countries and Winter Classic games, inaugural seasons and most recently jersey retirement ceremony patches.
The use of jersey patches was limited to Stanley Cup champions wearing a celebratory patches in the 1920's and did not reappear until the 1940's with a couple of patriotic examples followed by a patch worn by the Red Wings to commemorate the City of Detroit's 250th anniversary in 1950-51 and 1951-52.
Patches were non-existant for the remainder of the 1950's and all of the 1960's but when the Boston Bruins celebrated their 50th anniversary in 1973-74, the modern patch was born. In 1975-76, five of the Original Six clubs wore a patch for at least part of the season and the memorial patch came into being in 1977. Since then there has been at least one full season patch worn every season and their use exploded in popularity in the 1980's, kickstarted by the Edmonton Oilers wearing a different patch every year for four consecutive seasons from 1979-80 to 1982-83.
Here at ThirdStringGoalie there's nothing we like more than adding a patch to one of our jerseys. Of the over 450 non-game worn jerseys in our collection, 334 of them, or 72% have at least one additional patch added and we're frankly surprised the percentage is not higher. Of the 130 jerseys that do not have a patch, 68 are national team jerseys which tend to have far fewer patches than NHL jerseys, which frequently celebrate team anniversaries, hosting all-star games and Stanley Cup Finals appearances that don't apply to national teams.
There have even been occasions where we have first obtained a patch and then needed to get a jersey to go under it!
As with jerseys, a great number of our patches have come from ebay, due to the ability to find a great many of them for reasonable prices. There was a time when a little patience could turn up most anything you wanted and for a good price. Sometimes favorite sellers come and go, even reappearing again, although sometimes with the same inventory but a different user name.
One thing to be aware of though, is several sellers on ebay are selling reproductions of patches. In some cases they are making patches available which were never sold to the public or patches which are long out of production and we're pleased to finally be able to have the chance to purchase these. In other cases though, the same sellers are making copies of current, authentic patches which are readily available elsewhere. Normally, the majority of patches do not have a finished edge and the design is surrounded by a quarter of an inch wide white border which allows for the stitching so the patch can be sewn onto the jersey. The copies have a very small raised edge around the outside of the patch the authentic ones do not.
While some demand only authentic patches from when they were originally produced, in many cases those were never, or are now years later, unavailable anywhere. At this point it becomes a matter of going without in the name of authenticity or getting the best patch available in this day and age.
This is especially true of memorial patches to honor those who have passed away. The teams do not want to risk being seen profiting from those who have died, and do not make memorial patches available to the public as a general rule. But there is still a demand from collectors to own those patches to either honor the deceased, who have had a profound impact on their favorite club, make their jersey as accurate in appearance as possible or to simply add one to their jersey to make it stand out from the crowd. In the case of memorial patches, those who have the ability to reproduce such patches often waste little time in making them available via ebay, and it's up to the individual collector to decide if they want a known reproduction and, if so, to decide which version available has the highest degree of accuracy, as some are much better than others.
Aside from ebay, one of our favorites is Patch Collectibles thanks to their great service and authentic products.
Another trusted source is Murf & Pat Denny Sports Memorabilia. Murf has been in the hobby since before it was a hobby and deals in only authentic patches as well. If it's hard to find, Murf is always a good bet to be the only one with it in stock. His prices can be higher at times, so it's not a bad idea to check out his ebay listings before buying direct from his website.
These days patches are manufactured by National Emblem, and it's possible to buy directly from the them, but you won't find anything vintage in nature.
If really backed into a corner, we will check out what's in stock at River City Sports. They seem to be either getting out of the patch business or cutting way, way back on inventory, as they only list a handful of patches after 2004 and their prices have been greatly slashed on their older ones. Be warned however, that we consider RCS to be a last resort, as their shipping prices are simply ludicrous. $15 shipping on a flimsy little patch is out of line and does not go over well with us in the least, especially when compared to a $2 shipping charge from Patch Collectibles.
Another source worth mentioning is Patch Collection, not to be confused with Patch Collectibles. We wish we could recommend them more, but they do sell quite a high percentage of modern remakes with the raised edge border we discussed earlier. The majority of the photos they use on their website and their ebay auctions are overexposed, making your ability to detect the remakes quite difficult, but there are some items they sell that are originals and they do carry some things we cannot find elsewhere, so we do on occasion purchase from them, especially via ebay.
If you have any recommendations for other sellers of patches, feel free to post your favorites in the comments below.
A development in the patch collecting world is the use of a hard plastic backing on patches made by National Emblem to prevent them from being sewn on a jersey. Furthermore, under the plastic is a warning sticker which reads "WARNING: Attachment of this emblem to another product by sewing, adhesives or any other means will ruin it's collectable value and is not permitted without the approval of the National Hockey League."
To be blunt, screw that.
They fail to mention how adding a patch will enhance the collectable value of the jersey to which it is applied!
Collectors have developed a number of different methods for removing the rigid, thick plastic backing, not to be confused with the thin flexible plastic coating long used to prevent fraying and the embroidery stitching from accidentally unravelling.
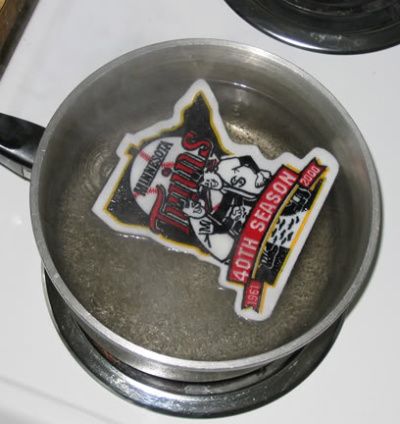
All three methods involve heating the patch in order to soften the adhesive and the plastic backing. The method we will illustrate here involves putting the patch in boiling water. The other options are heating the patch with a hair dryer or putting a paper towel over the patch and then placing a hot iron on it for 30-45 seconds.
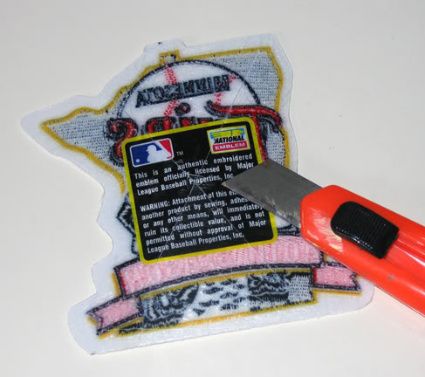
Step 1 - First, read the warning label on the back and laugh at the part where it says putting the patch on a jersey will ruin it's value. Then, take a sharp knife and cut an "x" in the plastic, being careful to not cut all the way through the plastic and into the patch itself.
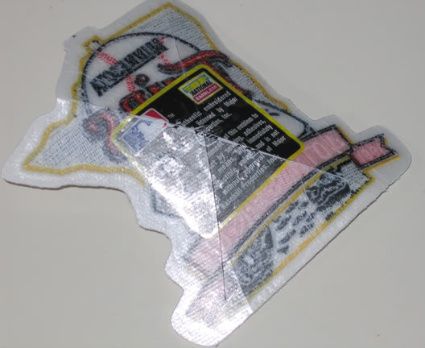
Step 2 - Fold the patch along the cuts to get the plastic to start to loosen from the patch.
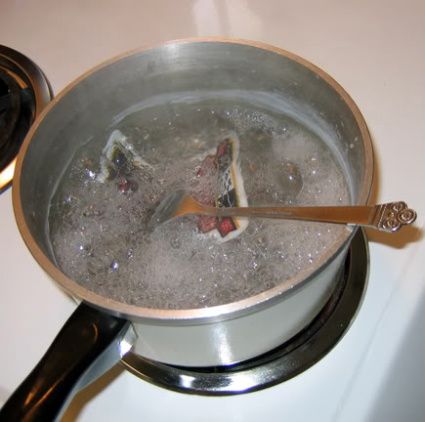
Step 3 - Boil the patch. Ten minutes should get the job done. This is the step where you can also use an iron or a hairdryer as the heat source. Note: NEVER microwave a patch. With metallic threads becoming more commonly used, their presence will cause burn marks on patch within seconds, ruining your patch.
Using a fork will help keep the patch submerged, but is not essential.
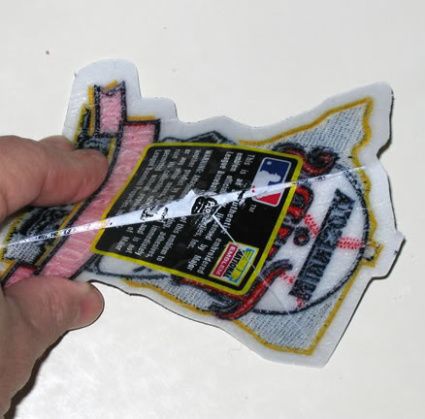
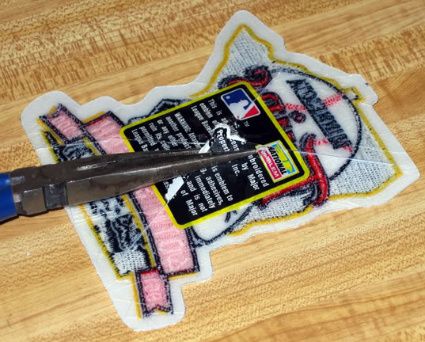
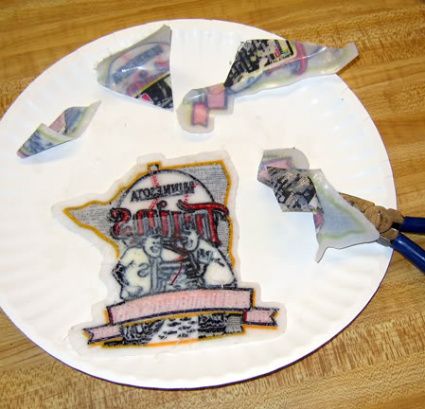
Step 4 - Take a needle nose pliers and grab the point of one of the pieces of plastic and twist the plastic back on itself toward the outer edge of the patch. If you have boiled it long enough, you may even get a second piece off during this step.
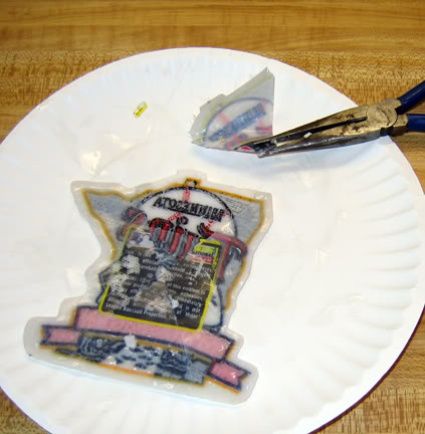
Step 5 - Return the patch to the boiling water once it cools too much to get any more pieces off and, after another 5-10 minutes, repeat the removal steps by again grabbing the point of the plastic in the center of the patch and twisting if off towards the outer edge.
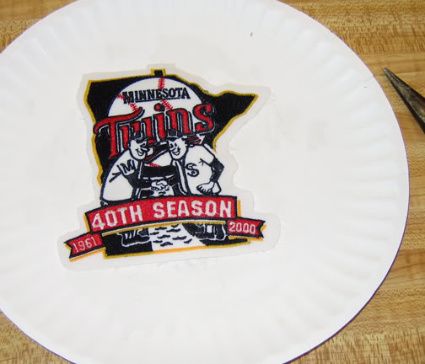
Step 6 - Once all the plastic is off, scrape off as much of the warning sticker that remains and blot the patch dry with a paper towel. I make a habit of putting it under a heavy cardboard box to flatten it while it dries. Once this is done, your newly flexible (but now devoid of "collectible value") patch is ready to be sewn on any jersey, which will only increase the jersey's collectible value.
We've had pretty good results using both the boiling and iron methods, but have had an incident where the horizontal threads of the patch backing have stuck to the plastic backing and pulled out of the patch, ruining it. This was likely caused by not enough heat being used, but please understand this is not a foolproof method, but is widely accepted as a good way to remove the backing.
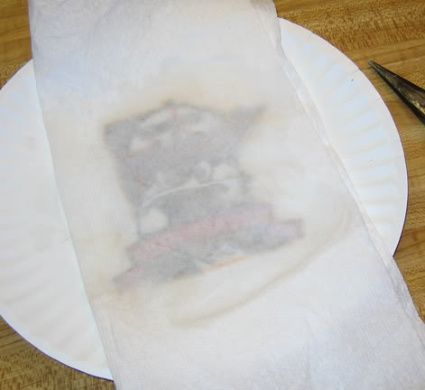
We have also tried another similar method, where instead of boiling the patch, we cover it with a doubled over paper towel and place a hot iron on top of it for a minute to soften the plastic backing and any adhesives before trying to pull up an edge with a pliers. Be sure not to put the iron directly on the plastic backing to avoid messing up the iron and the smell of burnt plastic.
We first try a minute to see if that is enough to be able to separate the backing from the patch, but have often found it needs more time than that. Be certain to not become distracted, such as leaving the room to check your email, due to the risk of scorching the patch or perhaps even starting the paper towel on fire!
Labels:
Hockey Jersey Training Camp
Subscribe to:
Comments (Atom)

